
Image not available
Illustrative purposes only

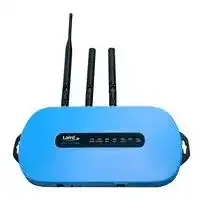
RG191
Wireless Gateway, WiFi, LoRaWAN, Bluetooth, IoT Network Development, 915MHz (US Version)
⚠️ Reference pricing provided. In case of supply shortages, we will connect you with our trusted procurement partners to ensure your project's continuity.
- Manufacturer: EZURIO
- Product type:
- Frequency RF:915MHz; Module Interface:Ethernet; Module Applications:Smart Metering & Remote Sensing, Industrial Automation/Monitoring Control, Agricultural & Rural IoT; Product Range:RG1xx
- SVHC: To Be Advised
- Frequency RF: 915MHz
- Product Range: RG1xx Series
- Module Interface: Ethernet
- Module Applications: Smart Metering & Remote Sensing, Industrial Automation/Monitoring Control, Agricultural & Rural IoT
| Delivery and price | |
|---|---|
| Units per pack | 1 |
| Price | 199.7 € |
| Current stock | 10+ |
| Lead time | 30 days |
Datasheet

A

## Quick Start Guide Sentrius RG1xx

_Version 1.2_

**Sentrius RG1xx** Quick Start Guide

## REVISION HISTORY

|**Version**<br>1.0<br>~~a ~~|**Version**<br>1.0<br>~~a ~~|**Date**<br>20 July2017<br> ~~ae~~|**Notes**<br>Initial Release<br>~~ee~~|**Approver**<br>Jonathan Kaye|
|---|---|---|---|---|
||1.1|28 July 2017|Minor fixes|Dave Drogowski|
||1.2|3 Aug 2017|Clarified web interface URL in section4:Log into|Shewan Yitayew|
||||the Gateway.Identified separate mDNS address.||


Americas: +1-800-492-2320 Europe: +44-1628-858-940 Hong Kong: +852 2923 0610

Embedded Wireless Solutions Support Center: 2 http://ews-support.lairdtech.com www.lairdtech.com/ramp © Copyright 2017 Laird. All Rights Reserved

**Sentrius RG1xx** Quick Start Guide

## CONTENTS

|1|Overview .............................................................................................................................................................4|
|---|---|
|2|About the Gateway .............................................................................................................................................4|
||2.1<br>Product Overview .......................................................................................................................................4|
|3|Connect the Hardware .......................................................................................................................................5|
||3.1<br>Connect the Gateway .................................................................................................................................5|
||3.1.1<br>Antenna Configuration .......................................................................................................................6|
|4|Log into the Gateway .........................................................................................................................................6|
|5|Connecting the Gateway to the Internet ...........................................................................................................8|
||5.1<br>Setting Up Ethernet ....................................................................................................................................8|
||5.2<br>Setting Up Wi-Fi ..........................................................................................................................................8|
|6|LoRa Packet Forwarding Set Up..........................................................................................................................9|
|7|Configuration with The Things Network ......................................................................................................... 10|
||7.1<br>Set up your account with The Things Network ....................................................................................... 10|
||7.2<br>Create an Application with TTN ............................................................................................................... 14|
||7.3<br>Register your RG1xx Gateway with TTN .................................................................................................. 15|
|8|Sending Data to the Cloud – Setup .................................................................................................................. 18|
|9|View DVK-RM1xx Data in the Cloud ................................................................................................................ 24|


Americas: +1-800-492-2320 Europe: +44-1628-858-940 Hong Kong: +852 2923 0610

Embedded Wireless Solutions Support Center: 3 http://ews-support.lairdtech.com www.lairdtech.com/ramp © Copyright 2017 Laird. All Rights Reserved

**Sentrius RG1xx** Quick Start Guide

## 1 OVERVIEW

This quick start guide describes how to configure the Sentrius gateway to forward LoRaWAN data to a cloud platform. The steps listed in this guide use the RG191 (US version) gateway and an RM191 (US version) module. The steps for using an RG186 and RM186 are similar.

**Note** : This guide uses the The Things Network (TTN) to show how to register your Gateway and visualize the incoming data on a Network server. If you are working with Stream IOT-X or LORIOT.io server, a similar guide will be available through their page to help you configure your gateway.

For more detailed information on how to use all the features of the Sentrius gateway, please see the Sentrius RG1xx User Manual, available from documentation tab at:  www.lairdtech.com/products/rg1xx-lora-gateway.

## 2 ABOUT THE GATEWAY

## **2.1 Product Overview**

The Sentrius™ RG1xx LoRa-Enabled Gateway from Laird is the ultimate in secure, scalable, robust LoRa solutions for end-to-end control of your private LoRaWAN network. Leveraging Laird’s field-proven and reliable 50 Series “Wireless Bridge” certified module, it also offers enterprise dual-band Wi-Fi, BT v4.0 (BLE and Classic) and wired Ethernet for complete design freedom. Based on the Semtech SX1301/SX1257 chipset designs, it offers a LoRa range up to 10 miles and pre-loaded LoRa Packet Forwarder software, perfect for highly scalable, flexible IoT networks. The Sentrius RG1xx Gateway works with Laird’s **Sentrius RM1xx Series** LoRa+BLE certified modules for simple out-of-the-box integration and is compatible with 3rd party Cloud and LoRa partners, as well as any LoRaWAN certified client devices.

Americas: +1-800-492-2320 Europe: +44-1628-858-940 Hong Kong: +852 2923 0610

Embedded Wireless Solutions Support Center: http://ews-support.lairdtech.com www.lairdtech.com/ramp

4

© Copyright 2017 Laird. All Rights Reserved

## **Sentrius RG1xx**

Quick Start Guide

1. LoRa and Wi-Fi antennas 2. LEDs

3. Fixing holes

4. User button

_**Figure 1: Top of the Sentrius™ RG1xx  gateway**_

1. DC power input

_**Figure 2: Back panel of the Sentrius™ RG1xx  gateway**_

   2. User button 3. Reset button 4. SD card slot 5. Ethernet connector

- 3 CONNECT THE HARDWARE

## **3.1 Connect the Gateway**

To use the gateway, you must power up the gateway and access the web interface via the Ethernet port. To do this, complete the following steps:

1. Follow the label on the box and connect the three antennas. Refer to _Antenna Configuration_ for additional information.

2. Connect the power supply (see #2 in Figure 3).

3. Connect the gateway to your router (#3 in Figure 3) using the Ethernet cable (#1 in Figure 3).

**==> picture [220 x 59] intentionally omitted <==**

**----- Start of picture text -----**<br>
3<br>yaa 2  ee 1<br>**----- End of picture text -----**<br>


_**Figure 3: Connecting the gateway**_

Americas: +1-800-492-2320 Europe: +44-1628-858-940 Hong Kong: +852 2923 0610

Embedded Wireless Solutions Support Center: 5 http://ews-support.lairdtech.com www.lairdtech.com/ramp

© Copyright 2017 Laird. All Rights Reserved

**Sentrius RG1xx** Quick Start Guide

## **3.1.1 Antenna Configuration**

To configure the antenna properly, complete the following steps:

1. Attach the two shorter antennas to the 2.4/5.5 GHz (Wi-Fi) ports.

2. Attach the third and longer antenna to the 868 MHz/900 MHz (LoRa) port.

## 4 LOG INTO THE GATEWAY

To log into the gateway web interface, follow these steps:

1. Determine the last three bytes of your gateway’s Ethernet MAC address. This can be found on the label on the bottom of the gateway; the last three bytes are highlighted (Figure 4).

_**Figure 4: Bottom label – last three bytes of the Ethernet MAC address highlighted**_

2. Enter the applicable URL into the web browser to access the web interface. For example, for the gateway used in this guide, the URL is https://rg1xx29378B. Replace the highlighted characters with the characters of the last three bytes of your Ethernet MAC ID. If your host understands mDNS such as a Mac, you may need to enter the URL as https://rg1xx29378B.local.

3. Accept the self-signed security certificate in the browser.

4. Click **Advanced** (Figure 5).

Americas: +1-800-492-2320 Europe: +44-1628-858-940 Hong Kong: +852 2923 0610

Embedded Wireless Solutions Support Center: 6 http://ews-support.lairdtech.com www.lairdtech.com/ramp

© Copyright 2017 Laird. All Rights Reserved

**Sentrius RG1xx** Quick Start Guide

_**Figure 5: Web interface – first screen**_

5. Click **Proceed** (Figure 6).

_**Figure 6: Web interface – second screen**_

6. Log on using the following default credentials (Figure 7):

   - Username: sentrius

Password: RG1xx

_**Figure 7: Gateway interface login screen**_

Americas: +1-800-492-2320 Europe: +44-1628-858-940 Hong Kong: +852 2923 0610

Embedded Wireless Solutions Support Center: http://ews-support.lairdtech.com www.lairdtech.com/ramp

7

© Copyright 2017 Laird. All Rights Reserved

**Sentrius RG1xx** Quick Start Guide

## 5 CONNECTING THE GATEWAY TO THE INTERNET

## **5.1 Setting Up Ethernet**

By default, the Ethernet port is set up for DHCP addressing. Connect the Ethernet cable to a network with internet access. If more advanced Ethernet configuration is needed, please see the Sentrius RG1xx User Manual in the documentation tab of the RG1xx product page at lairdtech.com: www.lairdtech.com/products/rg1xx-lora-gateway .

## **5.2 Setting Up Wi-Fi**

By default, the Wi-Fi in the gateway is not configured to connect to a Wi-Fi network. You must access the web interface on the gateway via the Ethernet interface to setup the Wi-Fi connection.

To set up the Wi-Fi, follow these steps:

1. Once logged into the web interface, navigate to the Wi-Fi page (Figure 8).

_**Figure 8: Wi-Fi page**_

2. To connect to a Wi-Fi network, click **Scan** to scan for nearby Wi-Fi networks (Figure 9). Scanning continues until you click **Stop** or select one of the scan results in the list.

_**Figure 9: Wi-Fi scan results**_

3. Click on the applicable scan result.

4. Enter the information for the applicable Wi-Fi network (Figure 10).

Americas: +1-800-492-2320 Europe: +44-1628-858-940 Hong Kong: +852 2923 0610

Embedded Wireless Solutions Support Center: http://ews-support.lairdtech.com www.lairdtech.com/ramp

8

© Copyright 2017 Laird. All Rights Reserved

**Sentrius RG1xx** Quick Start Guide

_**Figure 10: Wi-Fi profile dialog**_

5. Click **Connect** .

## 6 LORA PACKET FORWARDING SET UP

To set up LoRa packet forwarding on the gateway, follow these steps:

1. Click the **LoRa** tab in the main menu (Figure 11).

2. In the dropdown labeled _Select Preset,_ select the preset for **The Things Network (TTN)** .

3. Click **Apply** .

_**Figure 11: LoRa page – TTN preset**_

**Note** : In addition to the TTN, Laird currently supports presets for Stream IOT-X and LORIOT.io Network servers.

Americas: +1-800-492-2320 Europe: +44-1628-858-940 Hong Kong: +852 2923 0610

Embedded Wireless Solutions Support Center: http://ews-support.lairdtech.com www.lairdtech.com/ramp

9

© Copyright 2017 Laird. All Rights Reserved

**Sentrius RG1xx** Quick Start Guide

_**Figure 12: Select the preset for The Things Network**_

- **Note** : If operating with a network server that is not available as a preset, you may also manually configure the forwarder in the **Forwarder** page, available in the left menu. More information on this is available in the RG1xx User Guide, available in the documentation tab of the RG1xx product page at lairdtech.com:  www.lairdtech.com/products/rg1xx-lora-gateway

The network server must be compatible with the reference Semtech packet forwarder and can be configured on the forwarder page.

If the LoRa network operated on a different channel plan it is also necessary to program this into the gateway on the radios page.

## 7 CONFIGURATION WITH THE THINGS NETWORK

## **7.1 Set up your account with The Things Network**

To set up your account with The Things Network, follow these steps:

1. Go to https://www.thethingsnetwork.org/.

2. Create an account or log in to your existing account (Figure 13).

Americas: +1-800-492-2320 Europe: +44-1628-858-940 Hong Kong: +852 2923 0610

Embedded Wireless Solutions Support Center: http://ews-support.lairdtech.com www.lairdtech.com/ramp

10

© Copyright 2017 Laird. All Rights Reserved

**Sentrius RG1xx** Quick Start Guide

_**Figure 13: TTN login page**_

3. Click **Console** .

4. Register your gateway:

   - a. From the console screen, click **Gateways** (Figure 14).

_**Figure 14: TTN console screen**_

- b. Click **register gateway** (Figure 15).

Americas: +1-800-492-2320 Europe: +44-1628-858-940 Hong Kong: +852 2923 0610

Embedded Wireless Solutions Support Center: 11 http://ews-support.lairdtech.com www.lairdtech.com/ramp

© Copyright 2017 Laird. All Rights Reserved

**Sentrius RG1xx** Quick Start Guide

_**Figure 15: Click register gateway.**_

- c. Obtain the gateway ID from the Sentrius RG1xx web interface (Figure 16) or from the bottom label (Figure 17) on the Gateway.

_**Figure 16: Gateway ID**_

_**Figure 17: Gateway ID on bottom label**_

- d. Fill in the information to register the gateway as shown in Figure 18.

Americas: +1-800-492-2320 Europe: +44-1628-858-940 Hong Kong: +852 2923 0610

Embedded Wireless Solutions Support Center: http://ews-support.lairdtech.com www.lairdtech.com/ramp

12

© Copyright 2017 Laird. All Rights Reserved

**Sentrius RG1xx** Quick Start Guide

The gateway uses the legacy Semtech packet forwarder so be sure to check _I’m using the legacy packet forwarder._

_**Figure 18: Gateway registration**_

- e. Click Register Gateway.

Americas: +1-800-492-2320 Europe: +44-1628-858-940 Hong Kong: +852 2923 0610

Embedded Wireless Solutions Support Center: http://ews-support.lairdtech.com www.lairdtech.com/ramp

13

© Copyright 2017 Laird. All Rights Reserved

**Sentrius RG1xx** Quick Start Guide

**Note:** If using an RG186 gateway, be sure to select an EU router.

Once the gateway is registered, and if the gateway is communicating to The Things network, the status should display as _connected_ (Figure 19).

_**Figure 19: Registered gateway**_

## **7.2 Create an Application with TTN**

To create an application that can receive data from your LoRa-enabled gateway, complete the following steps:

1. At The Things Network’s website, click **Applications** in the top right of the menu.

2. Click **Add Application**

3. Complete the field as shown in Figure 20. Note that application ID should be in lower case and used to uniquely identify your application on the network.

4. Once you’ve created your application, click Add application to save it.

Americas: +1-800-492-2320 Europe: +44-1628-858-940 Hong Kong: +852 2923 0610

Embedded Wireless Solutions Support Center: http://ews-support.lairdtech.com www.lairdtech.com/ramp

14

© Copyright 2017 Laird. All Rights Reserved

**Sentrius RG1xx** Quick Start Guide

_**Figure 20: Add application screen**_

**Note:** If using an RG186 gateway, be sure to select an EU Handler registration.

## **7.3 Register your RG1xx Gateway with TTN**

To register your gateway as the device that will send data to TTN, follow these steps:

1. From the applications screen, select the application that you added in the previous section.

2. Click register device (Figure 21).

Americas: +1-800-492-2320 Europe: +44-1628-858-940 Hong Kong: +852 2923 0610

Embedded Wireless Solutions Support Center: http://ews-support.lairdtech.com www.lairdtech.com/ramp

15

© Copyright 2017 Laird. All Rights Reserved

**Sentrius RG1xx** Quick Start Guide

_**Figure 21: Application screen**_

3. Choose and enter a Device ID and an eight-byte Device EUI (Figure 22).

Americas: +1-800-492-2320 Europe: +44-1628-858-940 Hong Kong: +852 2923 0610

Embedded Wireless Solutions Support Center: http://ews-support.lairdtech.com www.lairdtech.com/ramp

16

© Copyright 2017 Laird. All Rights Reserved

**Sentrius RG1xx** Quick Start Guide

_**Figure 22: Enter a Device EUI**_

4. Click Register.

5. Make note of the Device EUI, Application EUI, and the App Key. These keys are needed later to set up the DVK- RM1xx (Figure 23).

_**Figure 23: Device EUI, application EUI, and app keys**_

Americas: +1-800-492-2320 Europe: +44-1628-858-940 Hong Kong: +852 2923 0610

Embedded Wireless Solutions Support Center: http://ews-support.lairdtech.com www.lairdtech.com/ramp

17

© Copyright 2017 Laird. All Rights Reserved

**Sentrius RG1xx** Quick Start Guide

## – 8 SENDING DATA TO THE CLOUD SETUP

To set up the DVK-RM1xx to send data to the cloud, follow these steps:

1. Connect the DVK-RM1xx to a PC via the USB connector on the board (Figure 24).

_**Figure 24: Connect the DVK-RM1xx to the PC**_

2. Download UwTerminalX (version 1.06) from the following site:

   - https://github.com/LairdCP/UwTerminalX/releases/tag/v1.06

3. Download _RM1xx-defs.h_ and _lora.app.us.sb_ (or _lora.app.eu.sb_ ) from https://github.com/LairdCP/RM1xxApplications. Place them in the same directory on your PC.

4. Use UwTerminalX to configure the RM1xx by doing the following:

   - a. Open UwTerminalX.

   - b. Click **Accept** (Figure 25).

_**Figure 25: UwTerminalX**_

Americas: +1-800-492-2320 Europe: +44-1628-858-940 Hong Kong: +852 2923 0610

Embedded Wireless Solutions Support Center: http://ews-support.lairdtech.com www.lairdtech.com/ramp

18

© Copyright 2017 Laird. All Rights Reserved

**Sentrius RG1xx** Quick Start Guide

- c. On the Config tab, select **RM186/RM191** from the Device drop-down menu.

- d. Select the virtual COM port that corresponds to your RM186/RM191 development board (Figure 26).

- e. Click **OK** (Figure 26).

_**Figure 26: Select the applicable virtual COM port**_

- f. Press **Enter** on the keyboard. The module should respond with _00_ .

- g. Type _at&f*_ to completely reset the module and clear the program flash.

_**Figure 27: Type at&f***_

- h. Load the _lora.app.us_ (or _lora.app.eu.sb_ ) script by right-clicking in the window, clicking **Xcompile + Load,** and then selecting _lora.app.us_ or _lora.app.eu.sb_ (Figure 28 and Figure 29).

Americas: +1-800-492-2320 Europe: +44-1628-858-940 Hong Kong: +852 2923 0610

Embedded Wireless Solutions Support Center: http://ews-support.lairdtech.com www.lairdtech.com/ramp

19

© Copyright 2017 Laird. All Rights Reserved

**Sentrius RG1xx** Quick Start Guide

_**Figure 28: Right-click and select XCompile+Load**_

_**Figure 29: File downloaded**_

- i. The command **at+dir** provides the content of the flash file system, which shows the loaded LoRa app (Figure 30).

Americas: +1-800-492-2320 Europe: +44-1628-858-940 Hong Kong: +852 2923 0610

Embedded Wireless Solutions Support Center: http://ews-support.lairdtech.com www.lairdtech.com/ramp

20

© Copyright 2017 Laird. All Rights Reserved

**Sentrius RG1xx** Quick Start Guide

_**Figure 30: Loaded LoRa app**_

5. Right-click the Terminal window and select **Automation** . The automation window appears (Figure 31)

_**Figure 31: Automation window**_

- a. Enter the security data to configure the module. The data from the TTN website, in our example, is as follows (yours will vary):

   - **Application EUI: 70B3D57EF00057AE Device EUI: 1234567890ABCDEF**

## **App Key: CE9FB3010C14A5ED6558CD60D89BA21F**

To enter this data using the automation window, enter the following in the first three fields of the automation window (replacing the hex strings with your App EUI, Device EUI, and App Key): `at+cfgex 1010 “70B3D57EF00057AE” at+cfgex 1011 “1234567890ABCDEF” at+cfgex 1012 “CE9FB3010C14A5ED6558CD60D89BA21F”`

In the fourth line, you may set the proper channels for the RM191 by entering the following command:

`at+cfgex 1009 "0002000000000000ff00`

**Note:** This command does not apply to the RM186.

Americas: +1-800-492-2320 Europe: +44-1628-858-940 Hong Kong: +852 2923 0610

Embedded Wireless Solutions Support Center: http://ews-support.lairdtech.com www.lairdtech.com/ramp

21

© Copyright 2017 Laird. All Rights Reserved

**Sentrius RG1xx** Quick Start Guide

Enter the commands as shown in Figure 32.

_**Figure 32: TTN website data entered**_

Americas: +1-800-492-2320 Europe: +44-1628-858-940 Hong Kong: +852 2923 0610

Embedded Wireless Solutions Support Center: 22 http://ews-support.lairdtech.com www.lairdtech.com/ramp © Copyright 2017 Laird. All Rights Reserved

**Sentrius RG1xx** Quick Start Guide

- b. Send the commands to the module by clicking **Send** next to each command.

_**Figure 33: Commands sent**_

- c. Run the LoRa app by typing _lora_ into UwTerminalX and pressing **Enter** . The module should join the network (Figure 34).

_**Figure 34: Run the LoRa app**_

Americas: +1-800-492-2320 Europe: +44-1628-858-940 Hong Kong: +852 2923 0610

Embedded Wireless Solutions Support Center: http://ews-support.lairdtech.com www.lairdtech.com/ramp

23

© Copyright 2017 Laird. All Rights Reserved

**Sentrius RG1xx** Quick Start Guide

## 9 VIEW DVK-RM1XX DATA IN THE CLOUD

To view DVK-RM1xx data in the cloud, do the following:

1. Navigate to the device page on the TTN website; the device should display as connected (Figure 35).

_**Figure 35: TTN device page**_

Americas: +1-800-492-2320 Europe: +44-1628-858-940 Hong Kong: +852 2923 0610

Embedded Wireless Solutions Support Center: http://ews-support.lairdtech.com www.lairdtech.com/ramp

24

© Copyright 2017 Laird. All Rights Reserved

**Sentrius RG1xx**

## Quick Start Guide

2. Click on the Data tab to view the data sent by the RM1xx (Figure 36).

_**Figure 36: RM1xx data**_

Americas: +1-800-492-2320 Europe: +44-1628-858-940 Hong Kong: +852 2923 0610

Embedded Wireless Solutions Support Center: http://ews-support.lairdtech.com www.lairdtech.com/ramp

25

© Copyright 2017 Laird. All Rights Reserved
Updated at April 25, 2026
About Novapart
Novapart is a B2B electronic component broker specialising in stock shortages and cost reduction. We source hard-to-find parts and identify compliant alternatives across a catalogue of 410,000+ components from 500+ manufacturers.
Learn more →Stock Shortage Specialist
When a component is unavailable, discontinued or has an unacceptable lead time, we tap into our network of vetted European and Asian distributors to source what you need — without compromising on quality or traceability.
Request a quote →Compliant Alternatives
We identify pin-to-pin, electrically equivalent substitutes that meet the same certifications (RoHS, AEC-Q100, REACH) as your original specification — validated against datasheets, not just part numbers. Often at a lower cost.
BOM Analysis service →