
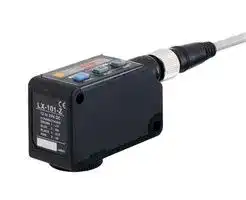


LX-101-P-Z
Sensor, Photo, 10 mm, PNP Open Collector, 12 to 24 VDC, LX-100 Series
- Manufacturer: PANASONIC
- Product type:
- SVHC: To Be Advised
- IP Rating: IP67
- Output Type: Digital - PNP
- Sensor Type: Digital Mark Sensor
- Light Source: -
- Product Range: LX-100 Series
- Qualification: -
- Sensing Method: Reflective
- Connection Method: 4 Pin Connector
- Sensing Range Max: 10mm
- Sensor Output Type: PNP Open Collector
- Supply Voltage Max: 24VDC
- Supply Voltage Min: 12VDC
- Sensing Distance Max: 10mm
- Supply Voltage DC Max: 24V
- Supply Voltage DC Min: 12V
- Operating Temperature Max: 55°C
- Operating Temperature Min: -10°C
| Delivery and price | |
|---|---|
| Units per pack | 50 |
| Price | 282.39 € |
| Current stock | 10+ |
| Lead time | 30 days |
Digital Mark Sensor Amplifier Built-in

899

**■** General terms and conditions ............. F-3 Related Information

> FIBER Related Information SENSORS ~~TS~~ fe LASER SENSORS PHOTOELECTRIC SENSORS ~~—~~ MICRO PHOTOELECTRIC SENSORS AREA SENSORS SAFETY LIGHT CURTAINS / SAFETY COMPONENTS PRESSURE / FLOW SENSORS INDUCTIVE PROXIMITY SENSORS PARTICULAR USE SENSORS ~~—~~ SENSOR OPTIONS SIMPLE WIRE-SAVING UNITS WIRE-SAVING SYSTEMS ~~—~~ MEASUREMENT SENSORS STATIC CONTROL DEVICES LASER MARKERS PLC

HUMAN MACHINE INTERFACES ENERGY MANAGEMENT SOLUTIONS FA COMPONENTS

MACHINE VISION SYSTEMS UV CURING SYSTEMS

Selection Guide Liquid Leak ~~a~~ Detection Liquid Level ~~a~~ Detection Water Detection Color Mark Detection Wafer Detection Ultrasonic Small / Slim Object Detection Obstacle Detection **LX-100 FZ-10** ~~=~~

## **LX-100 SERIES**

**■** Glossary of terms........................ P.1549~

**■** Selection guide...............................P.865~ **■** General precautions ................... P.1552~

**==> picture [30 x 7] intentionally omitted <==**

**----- Start of picture text -----**<br>
Recognition<br>**----- End of picture text -----**<br>


## ~~—~~ **panasonic.net/id/pidsx/global**

**==> picture [96 x 13] intentionally omitted <==**

**----- Start of picture text -----**<br>
PNP output  Timer Automatic<br>type available sensitivity setting<br>**----- End of picture text -----**<br>


## **Introduction of the 3 LED mark sensor**

## **Can detect any mark!**

Coaxial reflective optics and a sharp 1 × 5 mm 0.039 × 0.197 in spot enable high precision sensing. Stable detection of marks is possible.

## **R•G•B light emitting**

developedNewly **elements all in one To detect any marking, this unit is equipped with red, green and** blue blue **LED** light emit ing elements all in light emi **t** ting elements all in **one** ~~**.**~~ **High precision coaxial Total reflectionmirror reflective optical system Half mirror** Panasonic IndSUNX’s uniq **u** strial Devices SUNX’se coaxial reflective unique coaxial reflective opticoptics technology ensure **s** very } **Glass lens** accurate sensing. The unit is made technology ensures very accurate with a scratchproof glsensing. The unit is m **a** de with a ss lens. scratchproof glass lens.

## **4-digit digital display**

The 4-digit digital display enables numerical sensing control and minute settings.

**Operation panel** 3 large buttons that click into position making operation easy.

**Highest in the industry 12-bit A/D converter**

A resolution of 1/4,000 is realized to enable high precision mark sensing. **Receiving element**

## **Protection IP67**

Washing the machines and ▲Image schematic production line with water will not affect the sensor thanks to its waterproof construction. Spot size 1 × 5 mm 0.039 × 0.197 in approx.

## **Automatic optimal LED selection function**

The 3 colors of the R•G•B LEDs are Example: A packing film optimally selected according to the color combination. With the **LX-100** ’s Mark mode, the built-in “Automatic optimal LED selection function” automatically selects the LED for the largest contrast (S/N ratio) between the mark and base (non-mark area) to ensure optimal sensing. For more stable detection, the sensor makes selection according to the contrast and not according to the reflected light variation between the mark and base (non-mark area).

**==> picture [257 x 73] intentionally omitted <==**

**----- Start of picture text -----**<br>
Optimal<br>Mark Base Mark Base Mark Base<br>Light amount ratio = 6 : 8 Light amount ratio = 8 : 4 Light amount ratio = 4 : 1<br>Reflective light Reflective light Reflective light<br>**----- End of picture text -----**<br>


The example on the right deals with reflected light on packing film. Great figures are indicated for the blue LED’s light amount ratio and, for even more stable sensing, the blue LED effectuates this mark sensing.

Digital Mark Sensor **LX-100 SERIES**

900

## **Two detection modes can be selected from to suit the application**

**Mark mode** Ultra high-speed response

## Automatic **Automatic selection of the optimal LED** selection of the optimal LED

This sensing mode automatically selects a single color from the 3 R•G•B LEDs to achieve an ultra quick 45 µs response time. The automatic optimal LED selection function automatically selects the LED that is most suitable for the sensing. This function is perfect for ultra quick sensing.

## **Color mode** High precision discrimination

All 3 R•G•B LEDs light up and high precision mark color discrimination occurs using the R•G•B reflective light ratio. This function enables effective detection of films with patterns around the area of the mark. **The color around letters is detected as a mark.**

FIBER SENSORS

LASER SENSORS

PHOTOELECTRIC SENSORS MICRO PHOTOELECTRIC SENSORS

AREA SENSORS SAFETY LIGHT CURTAINS / SAFETY COMPONENTS PRESSURE / FLOW SENSORS INDUCTIVE PROXIMITY SENSORS PARTICULAR USE SENSORS

SENSOR OPTIONS SIMPLE WIRE-SAVING UNITS

WIRE-SAVING SYSTEMS MEASUREMENT SENSORS STATIC CONTROL DEVICES LASER MARKERS PLC

HUMAN MACHINE INTERFACES ENERGY MANAGEMENT SOLUTIONS

FA COMPONENTS

**Predetermined colors are detected as marks.**

MACHINE VISION SYSTEMS

UV CURING SYSTEMS

* You can select the mark mode or color mode through key operation.

## **High precision mark color discrimination**

The color mode on the **LX-100** series utilizes all 3 R•G•B LEDs to determine the R•G•B ratio of the mark color. The built-in 12-bit A/D converter enables high precision 1/4,000-resolution judgments. The figure below is a graphic description of this process.

**==> picture [450 x 146] intentionally omitted <==**

**----- Start of picture text -----**<br>
1.  1-level teaching for this mark 2.  R•G•B ratio calculated 3.  Precise determination of consistency of the spot color (R•G•B ratio)<br>eo.)6Ud a  Inconsistent oe b  Consistent le c  Inconsistent<br>a c<br>R: 15<br>b G: 10<br>B: 5<br>» | = J e T e<br>b : q e q e<br>Mark<br>H EE Z =HE a E aHE b E<br>Even similar colors are accurately determined using the R•G•B ratio. “=> 13 : 10 : : 5 15 + : E 10 : 5 15 T : E 10 : 6<br>Reflective light<br>**----- End of picture text -----**<br>


Selection Guide Liquid Leak Detection Liquid Level Detection Water Detection Color Mark Detection Wafer Detection Ultrasonic Small / Slim Object Detection Obstacle Detection

**LX-100 FZ-10**

Digital Mark Sensor **LX-100 SERIES**

901

FIBER SENSORS LASER SENSORS PHOTOELECTRIC SENSORS MICRO PHOTOELECTRIC SENSORS AREA SENSORS SAFETY LIGHT CURTAINS / SAFETY COMPONENTS PRESSURE / FLOW SENSORS INDUCTIVE PROXIMITY SENSORS PARTICULAR USE SENSORS ~~laa~~ SENSOR OPTIONS SIMPLE WIRE-SAVING UNITS WIRE-SAVING SYSTEMS MEASUREMENT SENSORS STATIC CONTROL DEVICES LASER MARKERS PLC ~~——~~ HUMAN MACHINE INTERFACES ENERGY MANAGEMENT SOLUTIONS FA COMPONENTS

MACHINE VISION SYSTEMS UV CURING SYSTEMS

Selection Guide Liquid Leak Detection Liquid Level Detection Water Detection Color Mark Detection Wafer Detection Ultrasonic Small / Slim Object Detection Obstacle Detection ~~—~~

## **Its digital display makes settings easy! Numerical control of the settings is possible**

The 4-digit digital display enables easy verification of received light from marks and base (non-mark area). Also, the threshold value can be controlled numerically enabling setting indication easily. Displaying the direct code enables settings verification. This function is handy for remote maintenance.

**==> picture [463 x 136] intentionally omitted <==**

**----- Start of picture text -----**<br>
MODE indicator a 4-digit digital display<br>(                                                   )Light-receiving amount andsetting values are displayed.<br>Operation indicator MODE indicator<br>MODE | on SEB -; r |<br>MODE key<br>(PRO mode: CANCEL key) OFF key<br>ON key CANCEL ~~ SELECT ENTER (PRO mode: ENTER key)<br>(PRO mode: SELECT key)<br>**----- End of picture text -----**<br>


## **Even beginners can quickly master MODE NAVI operation**

The sensor’s basic operations are represented by 6 indicators (MODE NAVI). The user can check what mode the sensor is presently in with a quick glance making operation simple.

|This is the sensing mode. The digital display<br>shows the light-receiving amount (mark mode)<br>and the color consistency (color mode).<br>**RUN**|This is the sensing mode. The digital display<br>shows the light-receiving amount (mark mode)<br>and the color consistency (color mode).<br>**RUN**||||||This mode enables a mark<br>mode/color mode selection.<br>**COLOR**|This mode enables a mark<br>mode/color mode selection.<br>**COLOR**|
|---|---|---|---|---|---|---|---|---|
||||||||||
|This is the threshold value<br>setting (teaching) mode.<br>**TEACH**|||‘ADJ bo:|LOLOLsy|||Timer type selection mode.<br>**TIMER**||
|This is the threshold<br>fine-adjustment mode.<br>**ADJ**|||||||This mode enables the setting<br>of various functions such as<br>key lock and timer period.<br>**PRO**||


## **Sensing status digitally controllable**

|The sensing status, displayed<br>numerically, can be verified at a<br>glance. Also, the sensor settings<br>for each type of packing film can be|**• Example of sensor setting indication**|**• Example of sensor setting indication**||
|---|---|---|---|
|digitally indicated.||||
||■Selected LED: Red LED<br>■Threshold value: 600|■Selected LED: Green LED<br>■Threshold value: 1850|■Selected LED: Blue LED<br>■Threshold value: 1600|


## **Direct codes enable settings verification at a glance**

The settings for the **LX-100** series sensors are displayed using a 4-digit direct code. Direct codes enable easy setting verification and maintenance by phone.

**==> picture [275 x 23] intentionally omitted <==**

**----- Start of picture text -----**<br>
What is the  The direct code is 0004. At present,<br>direct code?  the sensor is operating with a mark<br>at 2300 and base at 860.<br>**----- End of picture text -----**<br>


**LX-100 FZ-10**

Digital Mark Sensor **LX-100 SERIES**

902

FIBER SENSORS

LASER SENSORS PHOTOELECTRIC SENSORS MICRO PHOTOELECTRIC SENSORS

AREA SENSORS SAFETY LIGHT CURTAINS / SAFETY COMPONENTS PRESSURE / FLOW SENSORS INDUCTIVE PROXIMITY SENSORS PARTICULAR USE SENSORS

Selection Guide Liquid Leak Detection Liquid Level Detection Water Detection Color Mark Detection Wafer Detection Ultrasonic Small / Slim Object Detection Obstacle Detection

## **Direct code table (D-Code)**

|Timer period<br>Timer mode<br>Turn mode (Note 5)<br>ECO mode (Note 4)<br>Key lock<br>Display mode<br>2nd digit<br>3rd digit<br>4th digit<br>1st digit<br>Display<br>1 ms<br>2 ms<br>5 ms<br>10 ms<br>20 ms<br>50 ms<br>100 ms<br>200 ms<br>500 ms<br>non<br>OFF-delay<br>ON-delay<br>non<br>OFF-delay<br>ON-delay<br>non<br>OFF-delay<br>ON-delay<br>OFF<br>ON<br>OFF<br>ON<br>OFF<br>ON<br>OFF<br>ON<br>FINE<br>COARSE<br>FINE<br>COARSE<br>FINE<br>COARSE<br>FINE<br>COARSE<br>FINE<br>COARSE<br>FINE<br>COARSE<br>FINE<br>COARSE<br>FINE<br>COARSE<br>L-ON<br>D-ON<br>L-ON<br>D-ON<br>L-ON<br>D-ON<br>Consistent-ON<br>Inconsistent-ON<br>OFF<br>ON<br>OFF<br>ON<br>Mark mode (green)<br>Mark mode (blue)<br>Mark mode (red)<br>Color mode<br>Standard<br>Percent display<br>(Note 3)<br>Full lock<br>(All operations disabled)<br>RUN teaching<br>(Teaching only enabled)<br>RUN adjust<br>Threshold value<br>adjustment only enabled<br>Display<br>Display<br>Display<br>Sensing mode (light source color) Operation mode (Note 1) Sensing (Note 2)<br>● When in RUN mode, press the MODE<br>key for at least 2 sec. to display the<br>direct code. (Remove your finger from<br>the MODE key and the direct code will<br>disappear.)<br>(                            )<br>The sensor setting modes can be verified by a 4-digit<br>code (D-Code). The table below shows a list of all<br>available codes.<br>RUN Ml:}iwiwewe<br>COLOR<br>TEACH<br>eee<br>ata<br>am<br>at<br>TIMER<br>apJ.<br>WUE<br>a e**e**ns<br>ee<br>~~a~~<br>|_|<br>e<br>PL<br>ee2<br>p26<br>po 6<br>|Z |<br>**ee**0<br>|<br>pS<br>oe ee<br>eens<br>| =<br>—ee<br>j<br>|<br>**ee**0<br>| ==;<br>Lb |<br>|;<br>6 |<br>6<br>|<br>eeoe<br>**ee**6<br>| =; 4 Ee<br>ee<br>os<br>Po aee<br>|<br>-— [Af_|<br>POee<br>ra<br>| =<br>|}<br>Pefe ee[ee<br>**|**<br>Po atcCf et ||<br>po06<br>PepECEE|<br>PLOELELL~~J~~|Timer period<br>Timer mode<br>Turn mode (Note 5)<br>ECO mode (Note 4)<br>Key lock<br>Display mode<br>2nd digit<br>3rd digit<br>4th digit<br>1st digit<br>Display<br>1 ms<br>2 ms<br>5 ms<br>10 ms<br>20 ms<br>50 ms<br>100 ms<br>200 ms<br>500 ms<br>non<br>OFF-delay<br>ON-delay<br>non<br>OFF-delay<br>ON-delay<br>non<br>OFF-delay<br>ON-delay<br>OFF<br>ON<br>OFF<br>ON<br>OFF<br>ON<br>OFF<br>ON<br>FINE<br>COARSE<br>FINE<br>COARSE<br>FINE<br>COARSE<br>FINE<br>COARSE<br>FINE<br>COARSE<br>FINE<br>COARSE<br>FINE<br>COARSE<br>FINE<br>COARSE<br>L-ON<br>D-ON<br>L-ON<br>D-ON<br>L-ON<br>D-ON<br>Consistent-ON<br>Inconsistent-ON<br>OFF<br>ON<br>OFF<br>ON<br>Mark mode (green)<br>Mark mode (blue)<br>Mark mode (red)<br>Color mode<br>Standard<br>Percent display<br>(Note 3)<br>Full lock<br>(All operations disabled)<br>RUN teaching<br>(Teaching only enabled)<br>RUN adjust<br>Threshold value<br>adjustment only enabled<br>Display<br>Display<br>Display<br>Sensing mode (light source color) Operation mode (Note 1) Sensing (Note 2)<br>● When in RUN mode, press the MODE<br>key for at least 2 sec. to display the<br>direct code. (Remove your finger from<br>the MODE key and the direct code will<br>disappear.)<br>(                            )<br>The sensor setting modes can be verified by a 4-digit<br>code (D-Code). The table below shows a list of all<br>available codes.<br>RUN Ml:}iwiwewe<br>COLOR<br>TEACH<br>eee<br>ata<br>am<br>at<br>TIMER<br>apJ.<br>WUE<br>a e**e**ns<br>ee<br>~~a~~<br>|_|<br>e<br>PL<br>ee2<br>p26<br>po 6<br>|Z |<br>**ee**0<br>|<br>pS<br>oe ee<br>eens<br>| =<br>—ee<br>j<br>|<br>**ee**0<br>| ==;<br>Lb |<br>|;<br>6 |<br>6<br>|<br>eeoe<br>**ee**6<br>| =; 4 Ee<br>ee<br>os<br>Po aee<br>|<br>-— [Af_|<br>POee<br>ra<br>| =<br>|}<br>Pefe ee[ee<br>**|**<br>Po atcCf et ||<br>po06<br>PepECEE|<br>PLOELELL~~J~~|Timer period<br>Timer mode<br>Turn mode (Note 5)<br>ECO mode (Note 4)<br>Key lock<br>Display mode<br>2nd digit<br>3rd digit<br>4th digit<br>1st digit<br>Display<br>1 ms<br>2 ms<br>5 ms<br>10 ms<br>20 ms<br>50 ms<br>100 ms<br>200 ms<br>500 ms<br>non<br>OFF-delay<br>ON-delay<br>non<br>OFF-delay<br>ON-delay<br>non<br>OFF-delay<br>ON-delay<br>OFF<br>ON<br>OFF<br>ON<br>OFF<br>ON<br>OFF<br>ON<br>FINE<br>COARSE<br>FINE<br>COARSE<br>FINE<br>COARSE<br>FINE<br>COARSE<br>FINE<br>COARSE<br>FINE<br>COARSE<br>FINE<br>COARSE<br>FINE<br>COARSE<br>L-ON<br>D-ON<br>L-ON<br>D-ON<br>L-ON<br>D-ON<br>Consistent-ON<br>Inconsistent-ON<br>OFF<br>ON<br>OFF<br>ON<br>Mark mode (green)<br>Mark mode (blue)<br>Mark mode (red)<br>Color mode<br>Standard<br>Percent display<br>(Note 3)<br>Full lock<br>(All operations disabled)<br>RUN teaching<br>(Teaching only enabled)<br>RUN adjust<br>Threshold value<br>adjustment only enabled<br>Display<br>Display<br>Display<br>Sensing mode (light source color) Operation mode (Note 1) Sensing (Note 2)<br>● When in RUN mode, press the MODE<br>key for at least 2 sec. to display the<br>direct code. (Remove your finger from<br>the MODE key and the direct code will<br>disappear.)<br>(                            )<br>The sensor setting modes can be verified by a 4-digit<br>code (D-Code). The table below shows a list of all<br>available codes.<br>RUN Ml:}iwiwewe<br>COLOR<br>TEACH<br>eee<br>ata<br>am<br>at<br>TIMER<br>apJ.<br>WUE<br>a e**e**ns<br>ee<br>~~a~~<br>|_|<br>e<br>PL<br>ee2<br>p26<br>po 6<br>|Z |<br>**ee**0<br>|<br>pS<br>oe ee<br>eens<br>| =<br>—ee<br>j<br>|<br>**ee**0<br>| ==;<br>Lb |<br>|;<br>6 |<br>6<br>|<br>eeoe<br>**ee**6<br>| =; 4 Ee<br>ee<br>os<br>Po aee<br>|<br>-— [Af_|<br>POee<br>ra<br>| =<br>|}<br>Pefe ee[ee<br>**|**<br>Po atcCf et ||<br>po06<br>PepECEE|<br>PLOELELL~~J~~|Timer period<br>Timer mode<br>Turn mode (Note 5)<br>ECO mode (Note 4)<br>Key lock<br>Display mode<br>2nd digit<br>3rd digit<br>4th digit<br>1st digit<br>Display<br>1 ms<br>2 ms<br>5 ms<br>10 ms<br>20 ms<br>50 ms<br>100 ms<br>200 ms<br>500 ms<br>non<br>OFF-delay<br>ON-delay<br>non<br>OFF-delay<br>ON-delay<br>non<br>OFF-delay<br>ON-delay<br>OFF<br>ON<br>OFF<br>ON<br>OFF<br>ON<br>OFF<br>ON<br>FINE<br>COARSE<br>FINE<br>COARSE<br>FINE<br>COARSE<br>FINE<br>COARSE<br>FINE<br>COARSE<br>FINE<br>COARSE<br>FINE<br>COARSE<br>FINE<br>COARSE<br>L-ON<br>D-ON<br>L-ON<br>D-ON<br>L-ON<br>D-ON<br>Consistent-ON<br>Inconsistent-ON<br>OFF<br>ON<br>OFF<br>ON<br>Mark mode (green)<br>Mark mode (blue)<br>Mark mode (red)<br>Color mode<br>Standard<br>Percent display<br>(Note 3)<br>Full lock<br>(All operations disabled)<br>RUN teaching<br>(Teaching only enabled)<br>RUN adjust<br>Threshold value<br>adjustment only enabled<br>Display<br>Display<br>Display<br>Sensing mode (light source color) Operation mode (Note 1) Sensing (Note 2)<br>● When in RUN mode, press the MODE<br>key for at least 2 sec. to display the<br>direct code. (Remove your finger from<br>the MODE key and the direct code will<br>disappear.)<br>(                            )<br>The sensor setting modes can be verified by a 4-digit<br>code (D-Code). The table below shows a list of all<br>available codes.<br>RUN Ml:}iwiwewe<br>COLOR<br>TEACH<br>eee<br>ata<br>am<br>at<br>TIMER<br>apJ.<br>WUE<br>a e**e**ns<br>ee<br>~~a~~<br>|_|<br>e<br>PL<br>ee2<br>p26<br>po 6<br>|Z |<br>**ee**0<br>|<br>pS<br>oe ee<br>eens<br>| =<br>—ee<br>j<br>|<br>**ee**0<br>| ==;<br>Lb |<br>|;<br>6 |<br>6<br>|<br>eeoe<br>**ee**6<br>| =; 4 Ee<br>ee<br>os<br>Po aee<br>|<br>-— [Af_|<br>POee<br>ra<br>| =<br>|}<br>Pefe ee[ee<br>**|**<br>Po atcCf et ||<br>po06<br>PepECEE|<br>PLOELELL~~J~~|Timer period<br>Timer mode<br>Turn mode (Note 5)<br>ECO mode (Note 4)<br>Key lock<br>Display mode<br>2nd digit<br>3rd digit<br>4th digit<br>1st digit<br>Display<br>1 ms<br>2 ms<br>5 ms<br>10 ms<br>20 ms<br>50 ms<br>100 ms<br>200 ms<br>500 ms<br>non<br>OFF-delay<br>ON-delay<br>non<br>OFF-delay<br>ON-delay<br>non<br>OFF-delay<br>ON-delay<br>OFF<br>ON<br>OFF<br>ON<br>OFF<br>ON<br>OFF<br>ON<br>FINE<br>COARSE<br>FINE<br>COARSE<br>FINE<br>COARSE<br>FINE<br>COARSE<br>FINE<br>COARSE<br>FINE<br>COARSE<br>FINE<br>COARSE<br>FINE<br>COARSE<br>L-ON<br>D-ON<br>L-ON<br>D-ON<br>L-ON<br>D-ON<br>Consistent-ON<br>Inconsistent-ON<br>OFF<br>ON<br>OFF<br>ON<br>Mark mode (green)<br>Mark mode (blue)<br>Mark mode (red)<br>Color mode<br>Standard<br>Percent display<br>(Note 3)<br>Full lock<br>(All operations disabled)<br>RUN teaching<br>(Teaching only enabled)<br>RUN adjust<br>Threshold value<br>adjustment only enabled<br>Display<br>Display<br>Display<br>Sensing mode (light source color) Operation mode (Note 1) Sensing (Note 2)<br>● When in RUN mode, press the MODE<br>key for at least 2 sec. to display the<br>direct code. (Remove your finger from<br>the MODE key and the direct code will<br>disappear.)<br>(                            )<br>The sensor setting modes can be verified by a 4-digit<br>code (D-Code). The table below shows a list of all<br>available codes.<br>RUN Ml:}iwiwewe<br>COLOR<br>TEACH<br>eee<br>ata<br>am<br>at<br>TIMER<br>apJ.<br>WUE<br>a e**e**ns<br>ee<br>~~a~~<br>|_|<br>e<br>PL<br>ee2<br>p26<br>po 6<br>|Z |<br>**ee**0<br>|<br>pS<br>oe ee<br>eens<br>| =<br>—ee<br>j<br>|<br>**ee**0<br>| ==;<br>Lb |<br>|;<br>6 |<br>6<br>|<br>eeoe<br>**ee**6<br>| =; 4 Ee<br>ee<br>os<br>Po aee<br>|<br>-— [Af_|<br>POee<br>ra<br>| =<br>|}<br>Pefe ee[ee<br>**|**<br>Po atcCf et ||<br>po06<br>PepECEE|<br>PLOELELL~~J~~|Timer period<br>Timer mode<br>Turn mode (Note 5)<br>ECO mode (Note 4)<br>Key lock<br>Display mode<br>2nd digit<br>3rd digit<br>4th digit<br>1st digit<br>Display<br>1 ms<br>2 ms<br>5 ms<br>10 ms<br>20 ms<br>50 ms<br>100 ms<br>200 ms<br>500 ms<br>non<br>OFF-delay<br>ON-delay<br>non<br>OFF-delay<br>ON-delay<br>non<br>OFF-delay<br>ON-delay<br>OFF<br>ON<br>OFF<br>ON<br>OFF<br>ON<br>OFF<br>ON<br>FINE<br>COARSE<br>FINE<br>COARSE<br>FINE<br>COARSE<br>FINE<br>COARSE<br>FINE<br>COARSE<br>FINE<br>COARSE<br>FINE<br>COARSE<br>FINE<br>COARSE<br>L-ON<br>D-ON<br>L-ON<br>D-ON<br>L-ON<br>D-ON<br>Consistent-ON<br>Inconsistent-ON<br>OFF<br>ON<br>OFF<br>ON<br>Mark mode (green)<br>Mark mode (blue)<br>Mark mode (red)<br>Color mode<br>Standard<br>Percent display<br>(Note 3)<br>Full lock<br>(All operations disabled)<br>RUN teaching<br>(Teaching only enabled)<br>RUN adjust<br>Threshold value<br>adjustment only enabled<br>Display<br>Display<br>Display<br>Sensing mode (light source color) Operation mode (Note 1) Sensing (Note 2)<br>● When in RUN mode, press the MODE<br>key for at least 2 sec. to display the<br>direct code. (Remove your finger from<br>the MODE key and the direct code will<br>disappear.)<br>(                            )<br>The sensor setting modes can be verified by a 4-digit<br>code (D-Code). The table below shows a list of all<br>available codes.<br>RUN Ml:}iwiwewe<br>COLOR<br>TEACH<br>eee<br>ata<br>am<br>at<br>TIMER<br>apJ.<br>WUE<br>a e**e**ns<br>ee<br>~~a~~<br>|_|<br>e<br>PL<br>ee2<br>p26<br>po 6<br>|Z |<br>**ee**0<br>|<br>pS<br>oe ee<br>eens<br>| =<br>—ee<br>j<br>|<br>**ee**0<br>| ==;<br>Lb |<br>|;<br>6 |<br>6<br>|<br>eeoe<br>**ee**6<br>| =; 4 Ee<br>ee<br>os<br>Po aee<br>|<br>-— [Af_|<br>POee<br>ra<br>| =<br>|}<br>Pefe ee[ee<br>**|**<br>Po atcCf et ||<br>po06<br>PepECEE|<br>PLOELELL~~J~~|Timer period<br>Timer mode<br>Turn mode (Note 5)<br>ECO mode (Note 4)<br>Key lock<br>Display mode<br>2nd digit<br>3rd digit<br>4th digit<br>1st digit<br>Display<br>1 ms<br>2 ms<br>5 ms<br>10 ms<br>20 ms<br>50 ms<br>100 ms<br>200 ms<br>500 ms<br>non<br>OFF-delay<br>ON-delay<br>non<br>OFF-delay<br>ON-delay<br>non<br>OFF-delay<br>ON-delay<br>OFF<br>ON<br>OFF<br>ON<br>OFF<br>ON<br>OFF<br>ON<br>FINE<br>COARSE<br>FINE<br>COARSE<br>FINE<br>COARSE<br>FINE<br>COARSE<br>FINE<br>COARSE<br>FINE<br>COARSE<br>FINE<br>COARSE<br>FINE<br>COARSE<br>L-ON<br>D-ON<br>L-ON<br>D-ON<br>L-ON<br>D-ON<br>Consistent-ON<br>Inconsistent-ON<br>OFF<br>ON<br>OFF<br>ON<br>Mark mode (green)<br>Mark mode (blue)<br>Mark mode (red)<br>Color mode<br>Standard<br>Percent display<br>(Note 3)<br>Full lock<br>(All operations disabled)<br>RUN teaching<br>(Teaching only enabled)<br>RUN adjust<br>Threshold value<br>adjustment only enabled<br>Display<br>Display<br>Display<br>Sensing mode (light source color) Operation mode (Note 1) Sensing (Note 2)<br>● When in RUN mode, press the MODE<br>key for at least 2 sec. to display the<br>direct code. (Remove your finger from<br>the MODE key and the direct code will<br>disappear.)<br>(                            )<br>The sensor setting modes can be verified by a 4-digit<br>code (D-Code). The table below shows a list of all<br>available codes.<br>RUN Ml:}iwiwewe<br>COLOR<br>TEACH<br>eee<br>ata<br>am<br>at<br>TIMER<br>apJ.<br>WUE<br>a e**e**ns<br>ee<br>~~a~~<br>|_|<br>e<br>PL<br>ee2<br>p26<br>po 6<br>|Z |<br>**ee**0<br>|<br>pS<br>oe ee<br>eens<br>| =<br>—ee<br>j<br>|<br>**ee**0<br>| ==;<br>Lb |<br>|;<br>6 |<br>6<br>|<br>eeoe<br>**ee**6<br>| =; 4 Ee<br>ee<br>os<br>Po aee<br>|<br>-— [Af_|<br>POee<br>ra<br>| =<br>|}<br>Pefe ee[ee<br>**|**<br>Po atcCf et ||<br>po06<br>PepECEE|<br>PLOELELL~~J~~|Timer period<br>Timer mode<br>Turn mode (Note 5)<br>ECO mode (Note 4)<br>Key lock<br>Display mode<br>2nd digit<br>3rd digit<br>4th digit<br>1st digit<br>Display<br>1 ms<br>2 ms<br>5 ms<br>10 ms<br>20 ms<br>50 ms<br>100 ms<br>200 ms<br>500 ms<br>non<br>OFF-delay<br>ON-delay<br>non<br>OFF-delay<br>ON-delay<br>non<br>OFF-delay<br>ON-delay<br>OFF<br>ON<br>OFF<br>ON<br>OFF<br>ON<br>OFF<br>ON<br>FINE<br>COARSE<br>FINE<br>COARSE<br>FINE<br>COARSE<br>FINE<br>COARSE<br>FINE<br>COARSE<br>FINE<br>COARSE<br>FINE<br>COARSE<br>FINE<br>COARSE<br>L-ON<br>D-ON<br>L-ON<br>D-ON<br>L-ON<br>D-ON<br>Consistent-ON<br>Inconsistent-ON<br>OFF<br>ON<br>OFF<br>ON<br>Mark mode (green)<br>Mark mode (blue)<br>Mark mode (red)<br>Color mode<br>Standard<br>Percent display<br>(Note 3)<br>Full lock<br>(All operations disabled)<br>RUN teaching<br>(Teaching only enabled)<br>RUN adjust<br>Threshold value<br>adjustment only enabled<br>Display<br>Display<br>Display<br>Sensing mode (light source color) Operation mode (Note 1) Sensing (Note 2)<br>● When in RUN mode, press the MODE<br>key for at least 2 sec. to display the<br>direct code. (Remove your finger from<br>the MODE key and the direct code will<br>disappear.)<br>(                            )<br>The sensor setting modes can be verified by a 4-digit<br>code (D-Code). The table below shows a list of all<br>available codes.<br>RUN Ml:}iwiwewe<br>COLOR<br>TEACH<br>eee<br>ata<br>am<br>at<br>TIMER<br>apJ.<br>WUE<br>a e**e**ns<br>ee<br>~~a~~<br>|_|<br>e<br>PL<br>ee2<br>p26<br>po 6<br>|Z |<br>**ee**0<br>|<br>pS<br>oe ee<br>eens<br>| =<br>—ee<br>j<br>|<br>**ee**0<br>| ==;<br>Lb |<br>|;<br>6 |<br>6<br>|<br>eeoe<br>**ee**6<br>| =; 4 Ee<br>ee<br>os<br>Po aee<br>|<br>-— [Af_|<br>POee<br>ra<br>| =<br>|}<br>Pefe ee[ee<br>**|**<br>Po atcCf et ||<br>po06<br>PepECEE|<br>PLOELELL~~J~~|Timer period<br>Timer mode<br>Turn mode (Note 5)<br>ECO mode (Note 4)<br>Key lock<br>Display mode<br>2nd digit<br>3rd digit<br>4th digit<br>1st digit<br>Display<br>1 ms<br>2 ms<br>5 ms<br>10 ms<br>20 ms<br>50 ms<br>100 ms<br>200 ms<br>500 ms<br>non<br>OFF-delay<br>ON-delay<br>non<br>OFF-delay<br>ON-delay<br>non<br>OFF-delay<br>ON-delay<br>OFF<br>ON<br>OFF<br>ON<br>OFF<br>ON<br>OFF<br>ON<br>FINE<br>COARSE<br>FINE<br>COARSE<br>FINE<br>COARSE<br>FINE<br>COARSE<br>FINE<br>COARSE<br>FINE<br>COARSE<br>FINE<br>COARSE<br>FINE<br>COARSE<br>L-ON<br>D-ON<br>L-ON<br>D-ON<br>L-ON<br>D-ON<br>Consistent-ON<br>Inconsistent-ON<br>OFF<br>ON<br>OFF<br>ON<br>Mark mode (green)<br>Mark mode (blue)<br>Mark mode (red)<br>Color mode<br>Standard<br>Percent display<br>(Note 3)<br>Full lock<br>(All operations disabled)<br>RUN teaching<br>(Teaching only enabled)<br>RUN adjust<br>Threshold value<br>adjustment only enabled<br>Display<br>Display<br>Display<br>Sensing mode (light source color) Operation mode (Note 1) Sensing (Note 2)<br>● When in RUN mode, press the MODE<br>key for at least 2 sec. to display the<br>direct code. (Remove your finger from<br>the MODE key and the direct code will<br>disappear.)<br>(                            )<br>The sensor setting modes can be verified by a 4-digit<br>code (D-Code). The table below shows a list of all<br>available codes.<br>RUN Ml:}iwiwewe<br>COLOR<br>TEACH<br>eee<br>ata<br>am<br>at<br>TIMER<br>apJ.<br>WUE<br>a e**e**ns<br>ee<br>~~a~~<br>|_|<br>e<br>PL<br>ee2<br>p26<br>po 6<br>|Z |<br>**ee**0<br>|<br>pS<br>oe ee<br>eens<br>| =<br>—ee<br>j<br>|<br>**ee**0<br>| ==;<br>Lb |<br>|;<br>6 |<br>6<br>|<br>eeoe<br>**ee**6<br>| =; 4 Ee<br>ee<br>os<br>Po aee<br>|<br>-— [Af_|<br>POee<br>ra<br>| =<br>|}<br>Pefe ee[ee<br>**|**<br>Po atcCf et ||<br>po06<br>PepECEE|<br>PLOELELL~~J~~|Timer period<br>Timer mode<br>Turn mode (Note 5)<br>ECO mode (Note 4)<br>Key lock<br>Display mode<br>2nd digit<br>3rd digit<br>4th digit<br>1st digit<br>Display<br>1 ms<br>2 ms<br>5 ms<br>10 ms<br>20 ms<br>50 ms<br>100 ms<br>200 ms<br>500 ms<br>non<br>OFF-delay<br>ON-delay<br>non<br>OFF-delay<br>ON-delay<br>non<br>OFF-delay<br>ON-delay<br>OFF<br>ON<br>OFF<br>ON<br>OFF<br>ON<br>OFF<br>ON<br>FINE<br>COARSE<br>FINE<br>COARSE<br>FINE<br>COARSE<br>FINE<br>COARSE<br>FINE<br>COARSE<br>FINE<br>COARSE<br>FINE<br>COARSE<br>FINE<br>COARSE<br>L-ON<br>D-ON<br>L-ON<br>D-ON<br>L-ON<br>D-ON<br>Consistent-ON<br>Inconsistent-ON<br>OFF<br>ON<br>OFF<br>ON<br>Mark mode (green)<br>Mark mode (blue)<br>Mark mode (red)<br>Color mode<br>Standard<br>Percent display<br>(Note 3)<br>Full lock<br>(All operations disabled)<br>RUN teaching<br>(Teaching only enabled)<br>RUN adjust<br>Threshold value<br>adjustment only enabled<br>Display<br>Display<br>Display<br>Sensing mode (light source color) Operation mode (Note 1) Sensing (Note 2)<br>● When in RUN mode, press the MODE<br>key for at least 2 sec. to display the<br>direct code. (Remove your finger from<br>the MODE key and the direct code will<br>disappear.)<br>(                            )<br>The sensor setting modes can be verified by a 4-digit<br>code (D-Code). The table below shows a list of all<br>available codes.<br>RUN Ml:}iwiwewe<br>COLOR<br>TEACH<br>eee<br>ata<br>am<br>at<br>TIMER<br>apJ.<br>WUE<br>a e**e**ns<br>ee<br>~~a~~<br>|_|<br>e<br>PL<br>ee2<br>p26<br>po 6<br>|Z |<br>**ee**0<br>|<br>pS<br>oe ee<br>eens<br>| =<br>—ee<br>j<br>|<br>**ee**0<br>| ==;<br>Lb |<br>|;<br>6 |<br>6<br>|<br>eeoe<br>**ee**6<br>| =; 4 Ee<br>ee<br>os<br>Po aee<br>|<br>-— [Af_|<br>POee<br>ra<br>| =<br>|}<br>Pefe ee[ee<br>**|**<br>Po atcCf et ||<br>po06<br>PepECEE|<br>PLOELELL~~J~~|Timer period<br>Timer mode<br>Turn mode (Note 5)<br>ECO mode (Note 4)<br>Key lock<br>Display mode<br>2nd digit<br>3rd digit<br>4th digit<br>1st digit<br>Display<br>1 ms<br>2 ms<br>5 ms<br>10 ms<br>20 ms<br>50 ms<br>100 ms<br>200 ms<br>500 ms<br>non<br>OFF-delay<br>ON-delay<br>non<br>OFF-delay<br>ON-delay<br>non<br>OFF-delay<br>ON-delay<br>OFF<br>ON<br>OFF<br>ON<br>OFF<br>ON<br>OFF<br>ON<br>FINE<br>COARSE<br>FINE<br>COARSE<br>FINE<br>COARSE<br>FINE<br>COARSE<br>FINE<br>COARSE<br>FINE<br>COARSE<br>FINE<br>COARSE<br>FINE<br>COARSE<br>L-ON<br>D-ON<br>L-ON<br>D-ON<br>L-ON<br>D-ON<br>Consistent-ON<br>Inconsistent-ON<br>OFF<br>ON<br>OFF<br>ON<br>Mark mode (green)<br>Mark mode (blue)<br>Mark mode (red)<br>Color mode<br>Standard<br>Percent display<br>(Note 3)<br>Full lock<br>(All operations disabled)<br>RUN teaching<br>(Teaching only enabled)<br>RUN adjust<br>Threshold value<br>adjustment only enabled<br>Display<br>Display<br>Display<br>Sensing mode (light source color) Operation mode (Note 1) Sensing (Note 2)<br>● When in RUN mode, press the MODE<br>key for at least 2 sec. to display the<br>direct code. (Remove your finger from<br>the MODE key and the direct code will<br>disappear.)<br>(                            )<br>The sensor setting modes can be verified by a 4-digit<br>code (D-Code). The table below shows a list of all<br>available codes.<br>RUN Ml:}iwiwewe<br>COLOR<br>TEACH<br>eee<br>ata<br>am<br>at<br>TIMER<br>apJ.<br>WUE<br>a e**e**ns<br>ee<br>~~a~~<br>|_|<br>e<br>PL<br>ee2<br>p26<br>po 6<br>|Z |<br>**ee**0<br>|<br>pS<br>oe ee<br>eens<br>| =<br>—ee<br>j<br>|<br>**ee**0<br>| ==;<br>Lb |<br>|;<br>6 |<br>6<br>|<br>eeoe<br>**ee**6<br>| =; 4 Ee<br>ee<br>os<br>Po aee<br>|<br>-— [Af_|<br>POee<br>ra<br>| =<br>|}<br>Pefe ee[ee<br>**|**<br>Po atcCf et ||<br>po06<br>PepECEE|<br>PLOELELL~~J~~|
|---|---|---|---|---|---|---|---|---|---|---|
||||||||||||
||||1st digit||1st digit||4th digit||4th digit|4th digit|
|Display<br>|_|||Sensing mode (light source color) <br>|_|||Operation mode (Note 1) Sensing (Note 2)<br>ae||Sensing (Note 2)<br>e**e**ns|Display<br>~~a~~||Timer period<br>~~a~~||
||_|||_||Mark mode (green)<br>|_|<br>p26||COARSE<br>L-ON<br>ae<br>e<br>p26||FINE<br>e**e**ns|~~a~~|~~a~~|1 ms<br>~~a~~||
||_|||_||||||COARSE<br>e**e**ns<br>e|~~a~~<br>2<br>0|~~a~~|2 ms<br>~~a~~||
||_|||_||||COARSE<br>D-ON<br>a e<br>e<br>p26<br>|<br>eens||FINE<br>COARSE<br>e**e**ns<br>e<br>||~~a~~<br>2<br>0<br>oe|~~a~~<br>oe|5 ms<br>10 ms<br>~~a~~<br>ee||
|||||||COARSE<br>|<br>eens|0<br>oe<br>ee|oe<br>ee|10 ms<br>ee<br>ee||
|||Mark mode (blue)<br>p26<br>|<br>|||COARSE<br>L-ON<br>p26<br>|<br>eens<br>j<br>|||FINE<br>|<br>eens<br>|0<br>oe<br>ee<br>0|oe <br>ee|20 ms<br> ee<br>ee||
|||||||COARSE<br>eens<br>|ee<br>0|ee|50 ms<br>ee||
|||||COARSE<br>COARSE<br>D-ON<br>eens<br>j<br>| ==;<br>|<br>|=;||COARSE<br>FINE<br>eens<br>=;<br>|ee<br>0<br>6<br>6|ee|100 ms<br>ee||
|||||||COARSE<br>FINE<br>=;<br>=;4|0<br>6<br>6<br>os|os|200 ms<br>500 ms<br>os||
|||Mark mode (red)<br>|<br>|<br>|||COARSE<br>L-ON<br>|<br>|=;<br>Po<br>|||FINE<br>=;4|6<br>os|os|500 ms<br>os||
|||||||COARSE<br>=;4<br>Po|6<br>os|os|os||
|||||COARSE<br>D-ON<br>|<br>| =;<br>Po<br>|<br>-—<br>PO<br>|=<br>|}||FINE<br>=; 4 <br>Po<br>-—|6<br>os<br>||os<br>||os<br>|||
|ra|ra|||||FINE<br>COARSE<br>Po<br>-—<br>PO<br>|}||||<br>**|**||||
|ra||Color mode<br>|<br>|<br>po||COARSE<br>Consistent-ON<br>Po<br>|<br>-—<br>PO<br>|=<br>|}<br>Po<br>po06<br>PL||FINE<br>COARSE<br>Po <br>-— <br>PO<br>|}<br>Po||<br>**|**<br>et|||||<br>||||
|ra|ra|||||COARSE<br>PO<br>|}<br>Po<br>PL|et<br>EE<br>|**|**<br>et||<br>EE|<br>|||<br>|<br>||
|||||COARSE<br>Inconsistent-ON<br>| =<br>|}<br>Po<br>po06<br>PL||FINE<br>|}<br>Po <br>PL|et<br>EE<br>LE|**|**<br>et ||<br>EE|<br>|||<br>|<br>~~J~~||
|||||||COARSE<br><br>PL|EE<br>LELL||<br>EE|<br>LL||<br>|<br>LL~~J~~||


- 2) Sensing accuracy can be set to either FINE (standard) or COARSE.

- 3) The percent display is only enabled in mark mode.

- 4) ECO mode is a function that reduces power consumption by turning off the digital display in the event that no button operations are made for a predetermined time (approx. 10 sec. or more) in RUN mode. Press any button to turn the digital display on again.

- 5) The turn mode is a function that reverses the digital display making it easily to be viewed in the event that the sensor installation renders the display up-side-down. * Default setting: D-code = “ ”.

## **Super simple teaching**

## **Press the ON button at the targeted mark.**

## **External teaching possible**

Here is an example of the most basic setting method “2-level teaching”.

Teaching is possible through external input using an operation panel or touch panel even on hard-to-reach color mark sensors located inside an equipment. Also, models can be interchanged easily.

**==> picture [225 x 128] intentionally omitted <==**

**----- Start of picture text -----**<br>
Mode selection Press MODE key and select TEACH mode.<br>WV ON OFF<br>v Ff<br>WwW ie ew<br>1 Align the spot on the mark and press the ON key.<br>Teaching 2 Align the spot onto the base (non-mark area) and press the OFF key.<br>* The 1 2 order can be reversed.<br>y<br>me RUNGE py 4 Mion<br>Display showing<br>Wy i TEACH Ii “ rm rm x TIMER IP]<br>complete settings<br>**----- End of picture text -----**<br>


**==> picture [207 x 54] intentionally omitted <==**

**----- Start of picture text -----**<br>
Mark mode<br>2-level teaching and full-auto teaching possible<br>Color mode<br>1-level teaching possible<br>**----- End of picture text -----**<br>


SENSOR OPTIONS SIMPLE WIRE-SAVING UNITS WIRE-SAVING SYSTEMS MEASUREMENT SENSORS STATIC CONTROL DEVICES LASER MARKERS

PLC

HUMAN MACHINE INTERFACES ENERGY MANAGEMENT SOLUTIONS FA COMPONENTS MACHINE VISION SYSTEMS

UV CURING SYSTEMS

Teaching complete. The optimal LED is **Sensing** automatically selected and the sensor automatically returns to RUN mode.

## **Other teaching methods**

- Full-auto teaching:  In Mark mode, teaching is effective without stopping the sensing object.

- 1-level teaching:  In Color mode, the color detected is aligned by the spot and teaching is effective.

## **Compact design for significant space savings**

High precision sensing and multiple functions are all packed in a compact W57 × D24 × H38 mm W2.244 × D0.945 × H1.496 in body.

**==> picture [228 x 93] intentionally omitted <==**

**----- Start of picture text -----**<br>
Cable and plug-in connector<br>types are available<br>depending on the<br>equipment used.<br>These sensors can<br>be easily introduced  38 mm 1.496 in<br>to existing facilities.<br>57 mm<br>iz 24 mm  =e, 2.244 in  ><br>0.945 in  > a<br>**----- End of picture text -----**<br>


## **Key lock function**

The key lock function enables input operation control that prevents mistaken changes in the sensor settings. Other detailed settings include “RUN adjust”, allowing threshold value adjustment only, and “RUN teaching”, allowing teaching operation only.

If the sensor is set to “RUN adjust” or “RUN teaching”, adjustment and teaching are possible having the sensor remained in RUN mode.

**LX-100 FZ-10**

Digital Mark Sensor **LX-100 SERIES**

903

FIBER SENSORS LASER SENSORS PHOTOELECTRIC SENSORS MICRO PHOTOELECTRIC SENSORS AREA SENSORS

SAFETY LIGHT CURTAINS / SAFETY COMPONENTS PRESSURE / FLOW SENSORS INDUCTIVE PROXIMITY SENSORS PARTICULAR USE SENSORS SENSOR OPTIONS SIMPLE WIRE-SAVING UNITS WIRE-SAVING SYSTEMS MEASUREMENT SENSORS STATIC CONTROL DEVICES LASER MARKERS

PLC

HUMAN MACHINE INTERFACES ENERGY MANAGEMENT SOLUTIONS FA COMPONENTS

MACHINE VISION SYSTEMS UV CURING SYSTEMS

Selection Guide Liquid Leak Detection Liquid Level Detection Water Detection Color Mark Detection Wafer Detection Ultrasonic Small / Slim Object Detection Obstacle Detection

**LX-100 FZ-10**

## **ORDER GUIDE**

**==> picture [503 x 148] intentionally omitted <==**

**----- Start of picture text -----**<br>
Sensors Mating cable is not supplied with the plug-in connector type. Please order it separately.<br>Type Appearance Model No. Output Sensing range<br>LX-101 NPN open-collector transistor<br>LX-101-P PNP open-collector transistor<br>10 ±3 mm 0.394 ±0.118 in<br>LX-101-Z NPN open-collector transistor<br>LX-101-P-Z PNP open-collector transistor<br>Cable type<br>Plug-in  connector  type<br>**----- End of picture text -----**<br>


**==> picture [503 x 173] intentionally omitted <==**

**----- Start of picture text -----**<br>
Mating cables for plug-in connector type sensor Mating cable is not supplied with the plug-in connector type sensor. Please order it separately.<br>Mating cables for plug-in connector<br>Type Model No. Description type sensor<br>• CN-24B-C2 • CN-24BL-C2<br>• CN-24B-C5 • CN-24BL-C5<br>CN-24B-C2 Length: 2 m 6.562 ft<br>Straight<br>ø14 mm  ø5 mm<br>CN-24B-C5 Length: 5 m 16.404 ft ø0.551 in  ø0.197 in<br>0.34 mm [2]  4-core cabtyre cable, with<br>connector on one end<br>Cable outer diameter: ø5 mm ø0.197 in<br>CN-24BL-C2 Length: 2 m 6.562 ft 43.5 mm  ø5 mm  ø14 mm<br>1.713 in  ø0.197 in  ø0.551 in<br>Elbow<br>CN-24BL-C5 Length: 5 m 16.404 ft<br>31 mm<br>1.220 in<br>29 mm<br>1.142 in<br>**----- End of picture text -----**<br>


## **OPTIONS**

**==> picture [330 x 81] intentionally omitted <==**

**----- Start of picture text -----**<br>
Type Model No. Description<br>MS-LX-1<br>Sensor<br>Mounting bracket made for  LX-100  series applicable for<br>mounting  various kinds of installations<br>bracket<br>MS-LX-2<br>**----- End of picture text -----**<br>


## **Sensor mounting bracket**

## **• MS-LX-1**

**==> picture [135 x 67] intentionally omitted <==**

Two M4 (length 28 mm 1.102 in) screws with washers are attached.

## **• MS-LX-2**

**==> picture [57 x 72] intentionally omitted <==**

Two M4 (length 30 mm 1.181 in) screws with washers are attached.

Digital Mark Sensor **LX-100 SERIES**

904

FIBER SENSORS LASER SENSORS PHOTOELECTRIC SENSORS MICRO PHOTOELECTRIC SENSORS AREA SENSORS SAFETY LIGHT CURTAINS / SAFETY COMPONENTS PRESSURE / FLOW SENSORS INDUCTIVE PROXIMITY SENSORS PARTICULAR USE SENSORS SENSOR OPTIONS SIMPLE WIRE-SAVING UNITS WIRE-SAVING SYSTEMS MEASUREMENT SENSORS STATIC CONTROL DEVICES LASER MARKERS PLC HUMAN MACHINE INTERFACES ENERGY MANAGEMENT SOLUTIONS FA COMPONENTS MACHINE VISION SYSTEMS UV CURING SYSTEMS

Selection Guide Liquid Leak Detection Liquid Level Detection Water Detection Color Mark Detection Wafer Detection Ultrasonic Small / Slim Object Detection Obstacle Detection

**LX-100 FZ-10**

## **SPECIFICATIONS**

**==> picture [504 x 696] intentionally omitted <==**

**----- Start of picture text -----**<br>
Type Cable type Plug-in connector type<br>NPN output LX-101 LX-101-Z<br>Item PNP output LX-101-P LX-101-P-Z<br>CE marking directive compliance EMC Directive, RoHS Directive<br>Sensing range 10 ±3 mm 0.394 ±0.118 in<br>Spot size 1 × 5 mm 0.039 × 0.197 in (at 10 mm 0.394 in setting distance)<br>Supply voltage 12 to 24 V DC ±10 %  Ripple P-P 10 % or less<br>Normal mode: 750 mW or less (Current consumption 30 mA or less at 24 V supply voltage)<br>Current consumption<br>ECO mode: 600 mW or less (Current consumption 25 mA or less at 24 V supply voltage)<br><NPN output type> <NPN output type><br>NPN open-collector transistor NPN open-collector transistor<br>• Maximum sink current: 50 mA • Maximum sink current: 100 mA<br>• Applied voltage: 30 V DC or less (between output and 0 V) • Applied voltage: 30 V DC or less (between output and 0 V)<br>Output 1 • Residual voltage: 1.5 V or less (at 50 mA sink current) • Residual voltage: 1.5 V or less (at 100 mA sink current)<br>(OUT) <PNP output type> <PNP output type><br>PNP open-collector transistor PNP open-collector transistor<br>• Maximum source current: 50 mA • Maximum source current: 100 mA<br>• Applied voltage: 30 V DC or less (between output and +V) • Applied voltage: 30 V DC or less (between output and +V)<br>• Residual voltage: 1.5 V or less (at 50 mA source current) • Residual voltage: 1.5 V or less (at 100 mA source current)<br>Short-circuit protection Incorporated<br>Output operation Mark mode: Light-ON / Dark-ON (Auto-setting on teaching), Color mode: Consistent-ON / Inconsistent-ON (Setting on teaching)<br><NPN output type><br>NPN open-collector transistor<br>• Maximum sink current: 50 mA<br>• Applied voltage: 30 V DC or less (between output and 0 V)<br>Out(OUT)put 2 <PNP output type>• Residual voltage: 1.5 V or less (at 50 mA sink current) –<br>PNP open-collector transistor<br>• Maximum source current: 50 mA<br>• Applied voltage: 30 V DC or less (between output and +V)<br>• Residual voltage: 1.5 V or less (at 50 mA source current)<br>Short-circuit protection Incorporated –<br>Output operation Inverted operation of the output 1 –<br>Response time Mark mode: 45 µs or less, Color mode: 150 µs or less<br><NPN output type> <PNP output type><br>NPN non-contact input PNP non-contact input<br>• Signal condition:  High… +5 V to +V, or open  • Signal condition:  High… +4 V to +V<br>Teaching input Low… 0 to +2 V  (sink current: 3 mA or less)<br>(source current: 0.5 mA or less) Low… 0 to +0.6 V, or open<br>• Input impedance: 10 kΩ approx. • Input impedance: 10 kΩ approx.<br>Digital display 4-digit red LED display<br>Sensitivity setting Mark mode: 2-level teaching / Full-auto teaching, Color mode: 1-level teaching<br>Fine sensitivity adjustment function Incorporated<br>Timer function Incorporated with variable ON-delay/OFF-delay timer, switchable either effective or ineffective (Timer period: 1 to 500 ms, 9 levels variable)<br>Protection IP67 (IEC)<br>Ambient temperature –10 to +55 °C +14 to +131 °F (No dew condensation or icing allowed), Storage: –20 to +70 °C –4 to +158 °F<br>Ambient humidity 35 to 85 % RH, Storage: 35 to 85 % RH<br>Ambient illuminance Incandescent light: 3,000 ℓx or less at the light-receiving face<br>Voltage withstandability 1,000 V AC for one min. between all supply terminals connected together and enclosure<br>Vibration resistance 10 to 500 Hz frequency, 3.0 mm 0.118 in double amplitude (max. 20 G) in X, Y and Z directions for two hours each<br>Shock resistance 500 m/s [2]  acceleration (50 G approx.) in X, Y and Z directions three times each<br>Emitting element Combined Red / Green / Blue LEDs (Peak emission wavelength: 640 nm 0.025 mil / 525 nm 0.021 mil / 470 nm 0.019 mil)<br>Material Enclosure: PBT, Display cover: Polycarbonate, Operation buttons: Silicone rubber, Lens: Glass, Lens holder: Aluminum<br>Cable 0.2 mm [2]  5-core cabtyre cable, 2 m 6.562 ft long (Note 2)<br>Cable extension Extension up to total 100 m 328.084 ft is possible with 0.3 mm [2] , or more, cable.<br>Weight Net weight: 120 g approx., Gross weight: 180 g approx. Net weight: 55 g approx., Gross weight: 120 g approx.<br>Accessory M4 (length 30 mm 1.181 in) screw with washers: 2 pcs.<br>Model No.<br>Environmental resistance<br>**----- End of picture text -----**<br>


Notes: 1) Where measurement conditions have not been specified precisely, the conditions used were an ambient temperature of +23 °C +73.4 °F. 2) Mating cable is not supplied with the plug-in connector type. Please order it separately.

Digital Mark Sensor **LX-100 SERIES**

905

LASER SENSORS PHOTOELECTRIC SENSORS MICRO PHOTOELECTRIC SENSORS AREA SENSORS

SAFETY LIGHT CURTAINS / SAFETY COMPONENTS PRESSURE / FLOW SENSORS

INDUCTIVE PROXIMITY SENSORS PARTICULAR USE SENSORS ~~=~~ SENSOR OPTIONS SIMPLE WIRE-SAVING UNITS WIRE-SAVING SYSTEMS ~~:~~ MEASUREMENT SENSORS

STATIC CONTROL DEVICES LASER MARKERS PLC

HUMAN MACHINE INTERFACES ENERGY MANAGEMENT SOLUTIONS FA COMPONENTS MACHINE VISION SYSTEMS ~~Crs~~ UV CURING SYSTEMS ~~—~~ Selection Guide Liquid Leak Detection Liquid Level ~~-~~ Detection Water Detection Color Mark Detection Wafer Detection Ultrasonic

Small / Slim Object Detection Obstacle Detection

## ~~—~~ SENSORSFIBER ~~s~~ **I/O CIRCUIT AND WIRING DIAGRAMS**

~~a~~ NPN output type

~~a~~ PNP output type

## **LX-101** ( **-Z** )

## **LX-101-P** ( **-Z** )

## **I/O circuit diagram**

## **I/O circuit diagram**

**==> picture [495 x 132] intentionally omitted <==**

**----- Start of picture text -----**<br>
Terminal No. of plug-in connector type  Color code of cable type/ Terminal No. of plug-in connector type  Color code of cable type/<br>mating cable for plug-in connector type mating cable for plug-in connector type<br>D1  (Brown) +V  (Brown) +V<br>1  1<br>Load  10 kΩ  D2  (Pink) Teaching input<br>Tr1  (Black) Output 1   2<br>4  Load  *1<br>Tr2  (White) Output 2 (Note 2) 50 mA max. (Note 1)  +  12 to 24 V DC 0 V  ZD1  ZD2  50 mA max. (Note 1)  +  12 to 24 V DC<br>+5 V  ZD2  ZD1  50 mA max. (Note 1)  –  ±10 % Tr1  4 (Black) Output 1  50 mA max. (Note 1)  –  ±10 %<br>10 kΩ  D2  (Pink) Teaching input  Tr2  Load<br>2 3 (Blue) 0 V  *1  D1  3 (White) Output 2 (Note 2)  Load<br>(Blue) 0 V<br>Internal circuit  Users’ circuit  Internal circuit  Users’ circuit<br>Notes: 1) The current of the plug-in connector type  LX-101-Z  is 100 mA max. Notes: 1) The current of the plug-in connector type The current of the plug-in connector type  LX-101-P-Z  is 100 mA max.<br>2) The output 2 is not incorporated to the plug-in connector type The output 2 is not incorporated to the plug-in connector type  -— LX-101-Z . 2) The output 2 is not incorporated to the plug-in connector type The output 2 is not incorporated to the plug-in connector type  =a LX-101-P-Z<br>Sensor circuit  Sensor circuit<br>**----- End of picture text -----**<br>


Terminal No. of plug-in connector type Color code of cable type/ mating cable for plug-in connector type

Notes: 1) The current of the plug-in connector type **LX-101-Z** is 100 mA max. 2) The output 2 is not incorporated to the plug-in connector type The output 2 is not incorporated to the plug-in connector type **LX-101-Z** .

Notes: 1) The current of the plug-in connector type The current of the plug-in connector type **LX-101-P-Z** is 100 mA max. 2) The output 2 is not incorporated to the plug-in connector type The output 2 is not incorporated to the plug-in connector type **LX-101-P-Z** .

* 1

* 1

Non-voltage contact or NPN transistor

## Non-voltage contact or PNP transistor

> +V • Teaching input High: 5 V to +V, or open or Low: 0 to +2 V (source current: 0.5 mA or less) Teaching is carried out at the Low.

• Teaching input High: +4 V to +V (sink current: 3 mA or less) or Low: 0 to +0.6 V, or open 0 V Teaching is carried out at the High.

Symbols … D1, D2 : Reverse supply polarity protection diode ZD1, ZD2: Surge absorption zener diode Tr1, Tr2 : NPN output transistor

Symbols … D1, D2 : Reverse supply polarity protection diode ZD1, ZD2: Surge absorption zener diode Tr1, Tr2 : PNP output transistor

## **Connector pin layout of plug-in connector type**

**==> picture [267 x 282] intentionally omitted <==**

**----- Start of picture text -----**<br>
Connector pin No. Description<br>1 +V<br>2 Teaching input<br>3 0 V<br>4 Output<br>g=<br>(TYPICAL)TYPICAL))<br>(Unit: mm in)<br>Setting distance L Spot size (Note 2)<br>(Note 1) Width (W) Length (D)<br>7 0.276 2.0 0.079 5.5 0.217<br>W<br>8 0.315 1.7 0.067 5.5 0.217<br>9 0.354 1.2 0.047 5.3 0.209<br>D 10 0.394 1.0 0.039 5.0 0.197<br>11 0.433 1.3 0.051 5.0 0.197<br>12 0.472 1.5 0.059 5.0 0.197<br>13 0.512 2.0 0.079 5.0 0.197<br>===<br>Notes: 1)  Setting distance “L” represents the distance from<br>the lens surface to the sensing object.<br>2) Examples only meant for use as a guideline.<br>**----- End of picture text -----**<br>


## **SPOT SIZE CHARACTERISTICS (TYPICAL)TYPICAL))**

**==> picture [6 x 7] intentionally omitted <==**

**----- Start of picture text -----**<br>
L<br>**----- End of picture text -----**<br>


**LX-100** ~~=~~ **FZ-10**

Digital Mark Sensor **LX-100 SERIES**

906

FIBER SENSORS

LASER SENSORS

PHOTOELECTRIC SENSORS MICRO PHOTOELECTRIC SENSORS AREA SENSORS SAFETY LIGHT CURTAINS / SAFETY COMPONENTS PRESSURE / FLOW SENSORS INDUCTIVE PROXIMITY SENSORS PARTICULAR USE SENSORS

SENSOR OPTIONS SIMPLE WIRE-SAVING UNITS WIRE-SAVING SYSTEMS MEASUREMENT SENSORS STATIC CONTROL DEVICES LASER MARKERS PLC

HUMAN MACHINE INTERFACES ENERGY MANAGEMENT SOLUTIONS FA COMPONENTS MACHINE VISION SYSTEMS UV CURING SYSTEMS

Selection Guide Liquid Leak Detection Liquid Level Detection Water Detection Color Mark Detection Wafer Detection Ultrasonic Small / Slim Object Detection Obstacle Detection

## **PRECAUTIONS FOR PROPER USE**

Refer to p.1552~ for general precautions.

## **Others**

- Never use this product as a sensing device for personnel protection.

- In case of using sensing devices for personnel protection, use products which meet laws and standards, such as OSHA, ANSI or IEC etc., for personnel protection applicable in each region or country.

## **Mounting**

- Care must be taken regarding the sensor mounting direction with respect to the object’s direction of movement.

**==> picture [214 x 71] intentionally omitted <==**

**----- Start of picture text -----**<br>
<Correct> <Incorrect><br>Do not make the<br>sensor detect an object<br>in this direction<br>because it may cause<br>unstable operation.<br>Mark and base  Mark and base<br>**----- End of picture text -----**<br>


- With the optional sensor mounting bracket, the tightening torque should be 0.8 N·m or less.

## **Sensing glossy object**

- Objects with a glossy surface have a large amount of specular reflection particles that may destabilize sensing. In such a case, by slightly tilting the sensor’s beam axis, this specular reflection can be reduced rendering sensing more stable.

- If the surface of the sensing object has a shine, mount the sensor inclining approx. 10 to 15 degrees against the sensing object.

10 to 15°

- Do not use during the initial transient time (0.5 sec.) after the power supply is switched on.

- Take care that the sensor is not directly exposed to fluorescent light from a rapid-starter lamp or a high frequency light device or sunlight etc., as it may affect the sensing performance.

- Do not touch the lens of the sensor by hand directly. If the lens becomes dirty, wipe it off with a soft cloth gently.

- When the inside lens is steamed up, unscrew the lens to get rid of the condensation.

- These sensors are only for indoor use.

- Do not use this sensor in places having excessive vapor, dust, etc., or where it may come in direct contact with water, or corrosive gas.

- Take care that the product does not come in contact with water, oil, grease, or organic solvents, such as, thinner, etc.

- Make sure that stress by forcible bend or pulling with 76 N, or more, force is not applied to the sensor cable joint.

- This sensor cannot be used in an environment containing inflammable or explosive gases.

- Never disassemble or modify the sensor.

## **Wiring**

- Make sure to carry out wiring in the power supply off condition.

- Take care that wrong wiring will damage the sensor.

- Verify that the supply voltage variation is within the rating.

- Take care that if a voltage exceeding the rated range is applied, or if an AC power supply is directly connected, the sensor may get burnt or damaged.

- In case noise generating equipment (switching regulator, inverter motor, etc.) is used in the vicinity of this product, connect the frame ground (F.G.) terminal of the equipment to an actual ground.

- If power is supplied from a commercial switching regulator, ensure that the frame ground (F.G.) terminal of the power supply is connected to an actual ground.

- Take care that short-circuit of the load or wrong wiring may burn or damage the sensor.

- Do not run the wires together with high-voltage lines or power lines or put them in the same raceway. This can cause malfunction due to induction.

- Extension up to total 100 m is possible with 0.3 mm[2] , or more, cable. However, in order to reduce noise, make the wiring as short as possible.

**LX-100 FZ-10**

Digital Mark Sensor **LX-100 SERIES**

907

LASER SENSORS PHOTOELECTRIC SENSORS MICRO PHOTOELECTRIC SENSORS AREA SENSORS

SAFETY LIGHT CURTAINS / SAFETY COMPONENTS PRESSURE / FLOW SENSORS INDUCTIVE PROXIMITY SENSORS PARTICULAR USE SENSORS

SENSOR OPTIONS SIMPLE WIRE-SAVING UNITS

WIRE-SAVING SYSTEMS MEASUREMENT SENSORS STATIC CONTROL DEVICES LASER MARKERS PLC

Selection Guide Liquid Leak Detection Liquid Level Detection Water Detection Color Mark Detection Wafer Detection Ultrasonic Small / Slim Object Detection Obstacle Detection

**LX-100 FZ-10**

FIBER SENSORS

## **LIST OF PROMODE SETTING ITEMS**

- Before performing teaching or each detail setting, perform the setting of either mark mode or color mode with mark/color mode setting of NAVI mode.

HUMAN MACHINE INTERFACES ENERGY MANAGEMENT SOLUTIONS FA COMPONENTS MACHINE VISION SYSTEMS UV CURING SYSTEMS

**==> picture [504 x 417] intentionally omitted <==**

**----- Start of picture text -----**<br>
NAVI mode PROmode • For selecting a setting item, press 'ON key'. For confirming each selected setting item,<br>press 'OFF / ENTER key'. After confirming setting, the digital display flashes.<br>RUN Run For canceling setting, press 'MODE key'.<br>At mark mode setting: Indicates the absolute value  Press OFF OFF<br>of emitting amount. It is possible to indicate the Sets the sensing level Sensing setting ENTER Press SELECT<br>relative value (percent value)  (hysteresis.)<br>against threshold value. Sensing level: Fine Sensing level: Coarse<br>At color mode setting:<br>Indicates color matching<br>degree with relative value.<br>(20 ms) (50 ms) (100 ms) (200 ms) (500 ms)<br>Timer setting<br>Press<br>Sets timer setting period by<br>TEACH Teaching 9-steps.<br>At mark mode setting:<br>Sets the threshold value by<br>'2-level teaching' or 'full-auto  (10 ms) (5 ms) (2 ms) (1 ms)<br>teaching'. Key lock setting<br>At color mode setting:<br>Sets the threshold value by  Selects key lock function. Set full key lock.<br>'1-level teaching'. Set key lock except<br>for RUN teaching mode.<br>Set key lock except (RUN teaching)<br>for RUN adjust<br>OFF mode.(RUN adjust)<br>ADJ. Adjust Press<br>At mark mode setting:  ENTER Display setting<br>Allows fine adjustment of  Selects display method of<br>the threshold value. digital desplay. Mark mode setting: Displays incident light intesity Mark mode setting: Displays relative value (percentage)<br>At color mode setting:  Color mode setting: Displays color coincidence Color mode setting: Displays color coincidence<br>Allows adjustment of sensing<br>tolerance value.<br>Eco setting<br>Sets ON/OFF of eco mode.<br>COLOR Mark/Color mode setting<br>Eco setting: OFF Eco setting: ON<br>Sets mark mode or color<br>mode.<br>Display inverting mode setting<br>TIMER Timer operation setting Changes display direction of<br>Configures operation of the  digital display.<br>timer. Not invert the display. Invert the display.<br>PRO PRO Reset setting<br>Allows various detailed  Resets to factory setting.<br>settings to be configured. Not reset the settings. Reset the settings.<br>Press Press<br>**----- End of picture text -----**<br>


Digital Mark Sensor **LX-100 SERIES**

908

FIBER SENSORS LASER SENSORS PHOTOELECTRIC SENSORS MICRO PHOTOELECTRIC SENSORS AREA SENSORS SAFETY LIGHT CURTAINS / SAFETY COMPONENTS PRESSURE / FLOW SENSORS INDUCTIVE PROXIMITY SENSORS PARTICULAR USE SENSORS SENSOR OPTIONS SIMPLE WIRE-SAVING UNITS WIRE-SAVING SYSTEMS MEASUREMENT SENSORS STATIC CONTROL DEVICES LASER MARKERS PLC

HUMAN MACHINE INTERFACES ENERGY MANAGEMENT SOLUTIONS FA COMPONENTS MACHINE VISION SYSTEMS UV CURING SYSTEMS

Selection Guide Liquid Leak Detection Liquid Level Detection Water Detection Color Mark Detection Wafer Detection Ultrasonic Small / Slim Object Detection Obstacle Detection

## **DIMENSIONS (Unit: mm in)**

**==> picture [175 x 6] intentionally omitted <==**

**----- Start of picture text -----**<br>
The CAD data can be downloaded from our website.<br>**----- End of picture text -----**<br>


**==> picture [503 x 475] intentionally omitted <==**

**----- Start of picture text -----**<br>
LX-101  LX-101-P Sensor LX-101-Z  LX-101-P-Z Sensor<br>RUN  COLOR  RUN  COLOR<br>TEACH  TIMER  TEACH  TIMER<br>0.945 24  OPE. MODE ADJ  ON  TEACH  OFF PRO  0.945 24  OPE. MODE ADJ  ON  TEACH  OFF PRO<br>CANCEL  SELECT  ENTER  CANCEL  SELECT  ENTER<br>71.5<br>2.815<br>0.059 1.5  5  2.244 57 47  0.059 1.5  5  2.244 57 47  ø0.567 ø14.4<br>0.197  1.850  0.197  1.850<br>9.4<br>0.370<br>35  25  35  25<br>1.378 0.984  1.378 0.984<br>M12<br>0.197 5  0.118 3  15 (         ) øø22 0.866  2-ø4.5 mounting holes ø0.177 0.197 5  0.118 3  15 (         ) ø0.866 ø22  2-ø4.5 mounting holes ø0.177<br>0.591  0.591<br>MS-LX-1 Sensor mounting bracket (Optional) MS-LX-2 Sensor mounting bracket (Optional)<br>3 80<br>0.118 0.78720 R2 R0.0793.150 0.1183<br>39 28<br>1.535 1.102 R2<br>151.06327 1.19730.40.82721 R0.079 0.1574 0.2366 3-M5 × 0.8 0.031 1.07127.2<br>4-R2 R0.079 0.591<br>2-M5 × 0.8 0.031<br>2-R4.7 R0.185 0.3549 411.10228 R4.7 R0.185<br>1.614<br>2-R5 R0.197 60<br>2.362 15 3-R2 R0.079<br>0.591<br>57 47<br>2.244 1.850<br>2-R5 R0.197 45<br>0.98425 30 1.57540 1.772<br>1.181<br>15 2-M4 × 0.7 0.028<br>0.591 57.2 47 57<br>2.252 1.850 2.244<br>25 2-R5  4<br>0.1975 0.1975 0.984 47 0.39410 R0.197 0.157 R2 R0.079<br>1.850 4-M4 × 0.7 0.028<br>57<br>2.244<br>72<br>Material: Stainless steel (SUS) 2.835 0.2366 0.98425 0.1975 0.1975<br>Two M4 (length 28 mm 1.102 in) screws with washers are attached. Material: Stainless steel (SUS)<br>Two M4 (length 30 mm 1.181 in) screws with washers are attached.<br>**----- End of picture text -----**<br>


**LX-100 FZ-10**
Updated at April 28, 2026
Panasonic Industry is a global leader in the design and manufacture of high-quality electronic components. Renowned for a commitment to continuous innovation, the company provides the essential building blocks that empower modern engineering. From industrial automation to consumer electronics, Panasonic's components are trusted worldwide for their outstanding reliability, efficiency, and long-term performance. The extensive portfolio is anchored by a massive selection of passive components, featuring an industry-leading range of aluminium electrolytic, film, and polymer capacitors. Alongside these advanced capacitance solutions, engineers rely on Panasonic's robust power inductors and a highly versatile array of electromechanical devices, including solid-state, power, and signal relays engineered to excel in demanding environments. Beyond core passives and switching solutions, the offering encompasses critical circuit protection devices such as TVS varistors and NTC thermistors, as well as sophisticated thermal management materials. Panasonic also delivers precision light and motion sensors, highly reliable batteries, and advanced Bluetooth and WLAN connectivity modules, providing a comprehensive ecosystem of components to support next-generation technological design.
About Novapart
Novapart is a B2B electronic component broker specialising in stock shortages and cost reduction. We source hard-to-find parts and identify compliant alternatives across a catalogue of 410,000+ components from 500+ manufacturers.
Learn more →Stock Shortage Specialist
When a component is unavailable, discontinued or has an unacceptable lead time, we tap into our network of vetted European and Asian distributors to source what you need — without compromising on quality or traceability.
Request a quote →Compliant Alternatives
We identify pin-to-pin, electrically equivalent substitutes that meet the same certifications (RoHS, AEC-Q100, REACH) as your original specification — validated against datasheets, not just part numbers. Often at a lower cost.
BOM Analysis service →